Project
COSMIC Capstone Challenge (C3) | Team MÖBIUS “Starstitcher” Trackless Cable Braiding Machine
A conceptual, trackless cable-braiding manufacturing system designed for space-ready, reconfigurable fabrication.
Starstitcher is a trackless braiding concept for in-space manufacturing that uses independently guided carriers, material handling, and localized curing to produce braided structures in arbitrary patterns and forms.
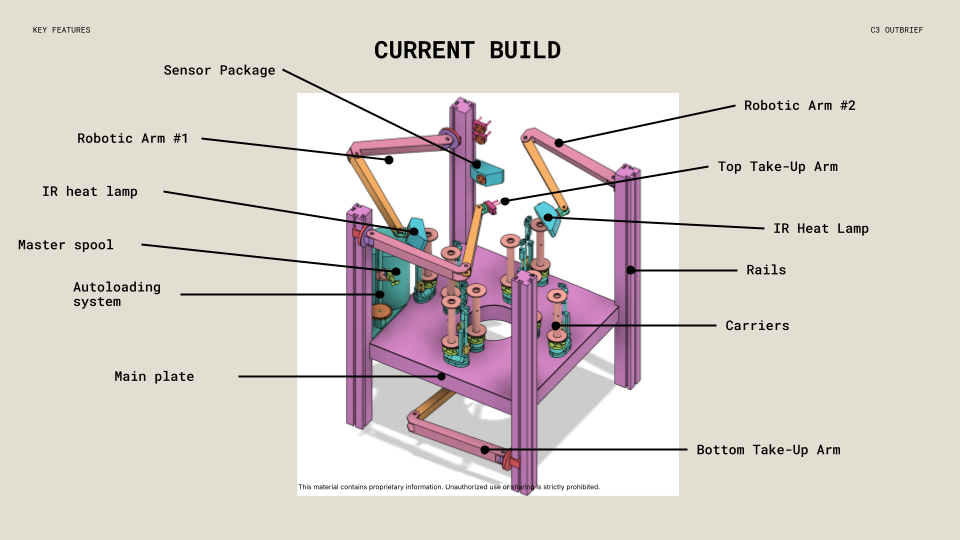
Concept render showing the proposed Starstitcher architecture and major subsystems.
Why
Starstitcher was proposed as a compact, reconfigurable manufacturing concept for space environments where resupply is expensive and mission needs evolve. The goal was a single system that could fabricate braided composite structures on demand, without being locked into one fixed geometry or one fixed motion track.
- Primary goal: a trackless braiding approach enabling flexible patterns and outcomes.
- Constraints: microgravity operation, launch packaging volume, limited power, material handling, repeatability.
- Outcome focus: communicate a credible systems concept with clear subsystem ownership and tradeoffs.
What
Starstitcher is a conceptual, trackless cable braiding system designed for space-ready manufacturing. It takes raw filament and forms braided structures in any form supported by an achievable braiding pattern and process setup, rather than limiting output to one or two hard-tooled geometries.
Key requirements
- Trackless carrier architecture to enable flexible braid patterns and reconfiguration.
- Launch-ready packaging and deployment into an operational configuration.
- Material handling compatible with microgravity constraints and limited crew time.
- Localized curing strategy compatible with constrained power and thermal environments.
System Architecture & Subsystems
At a high level, Starstitcher combines independent carriers, material handling, tension management, and localized curing to translate raw filament into braided composite structures. The defining idea is the trackless carrier concept, enabling patterns to be driven by system coordination and geometry rather than fixed tracks.
Carrier and braiding system
Independent carriers transport filament spools through coordinated paths around the working area. By removing fixed tracks, the system can support a wide range of braid trajectories and densities, enabling reconfiguration without redesigning mechanical tooling.
Take-up and tension control
The take-up arms manage tension and geometry as material is deposited, maintaining consistent braid formation and stabilizing the workpiece during fabrication.
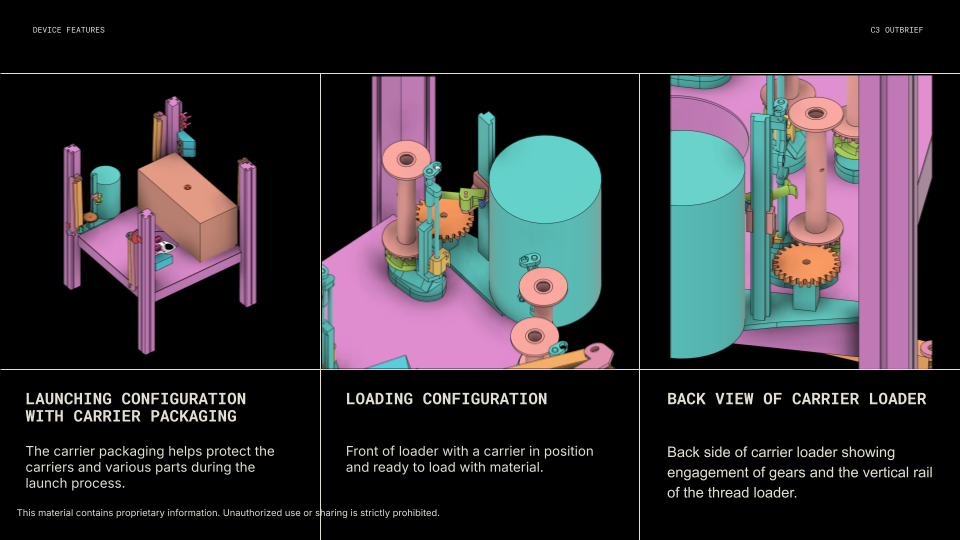
Material handling and loading
A loading mechanism supports spool staging and integration with carriers. This subsystem was designed to reduce intervention time and support launch packaging and deployment constraints.
Thermal processing and curing
Integrated IR heating elements provide localized thermal input to support curing or consolidation of braided material, targeting a manufacturing flow that remains compatible with constrained power and thermal management in space environments.
Launch packaging and deployment
The frame and subsystem arrangement were designed to compact for launch and then deploy to an operational configuration. This reduces overhead hardware and supports a practical space-ready concept.
Deployment & Packaging
This concept emphasizes launch readiness, protecting carriers during launch and enabling a staged deployment into an operational configuration once on-orbit.
Concept Motion Study
The video below shows a motion mock-up used to communicate how carriers would traverse coordinated paths to form braid patterns in a trackless architecture.
Representative Output
The braid image is included to illustrate the type of braided geometry and material behavior relevant to this concept. This specific braid sample was produced by a teammate and is shown for context only.
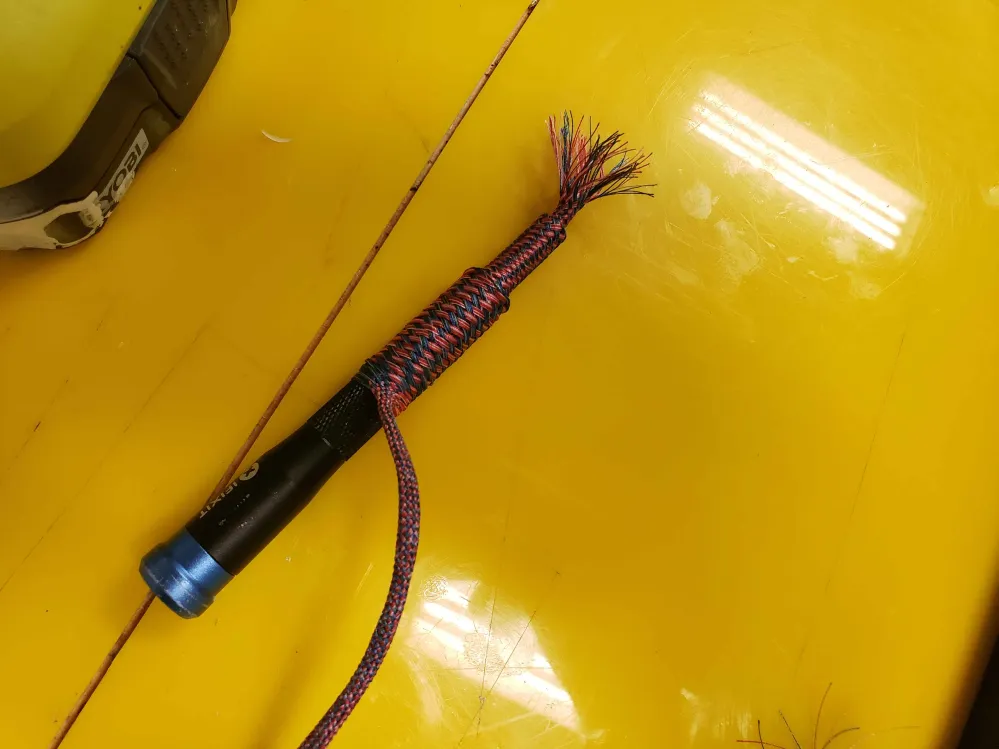
Representative braid sample produced by a teammate. Included to contextualize real-world output.
My Role
I contributed as a general engineer with an emphasis on mechanical design and system integration. My work focused on CAD ownership, mechanical subsystem development, manufacturing feasibility, and supporting the end-to-end narrative so the concept could be communicated clearly and efficiently.
Results
- Delivered a coherent, space-ready trackless manufacturing concept with subsystem-level justification.
- Produced CAD and visuals to communicate architecture, deployment, and motion intent.
- Demonstrated team execution on a complex, constraint-driven systems concept.
What I'd Do Next
- Define a formal subsystem interface map and a basic control architecture for carrier coordination.
- Build a small-scale bench mock-up to validate carrier motion, tension control, and repeatability.
- Run a feasibility pass on power and thermal budgets for in-space curing scenarios.
Team Credit
Team members and friends :) who made up Team MÖBIUS:
- SAVANNA PAIGE
- BRONSON BACH
- MALEK MAYYAS
- JACOB ANDRUS